If you have a Netflix account, you may have seen martial arts videos listed in their catalog. After seeing these myself, I decided to rent them and watch them, viewing them from the perspective of a foam combat fighter to see what could be gleaned from these videos on other styles. Having watched one in the past, I hoped to pick up at least one interesting new idea. My biggest complaint with a lot of martial arts systems is that their instruction focuses on the what, not the why. Don’t tell me how your kata is done, tell me why you end with the off-hand foot kicked out in a cross-step at the end.
Part 1: Pants
So, with mixed hopes, I popped “Samurai Swordsmanship Vol 2: Intermediate Sword Program” intro my DVD player. The DVD starts with a ten minute video on how to get dressed. Knowing how to tie an obi with a flat knot would be handy if I wore a hakama because the flat knot prevents the obi’s knot from being pressed into your body by the hakama pants. Sadly, the video doesn’t point this out; I deduce this from my own experiences. My optimism wanes.
After a short video on sword etiquette, the video talks about three sword postures, or stances.
Part 2: Stances
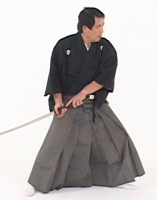
The first is Migi Waki, which is a sideways posture. Off-hand foot is forward, feet are about a shoulder-width and a half apart, and the sword is held at the rear (dominant hand) hip, with the blade angled down. No explanation is given for the stance, but I’ve fought numerous people adopting the stance. However effective it is for a Samurai with a real sword, it gets you killed very quickly in foam fighting; your defense is behind you, your attack angles are too predictable, and your weapon has to travel way too far to hit your opponent. The initial upward angle of your primary attack is likely to be problematic for your opponent if he is also using a two-handed sword, but the additional flexibility and reach of a single-hand stance removes this problem in foam fighting. (To demonstrate, hold your hands together, extend them as far in front of you as you can, then reach towards your left while holding your hands together. There will come a point where you can reach no further left unless you left go, and then your left hand can move much further to the left. )
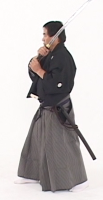
The second stance is Hidari Hasso, which is a stance where the shoulders are square to the opponent. The feet at a shoulder width apart and the sword is held against the off-hand shoulder. This is another classic example of how other martial arts do not translate to foam fighting. The hips and stomach are exposed, and the dominant hand shoulder is idea for a stab, as the blocking device is not only on the wrong side of the body, but the head is in the way. With the dominant-hand arm across the body, it is also extremely vulnerable to a quick chop to the forearm. The block for the forearm is going to not only be difficult, but is going to force you to bring your own weapon across your eye-line right in front of your face, which you generally want to avoid. Not only will this disrupt your vision, but movements across the eye-line tend to instinctively draw and focus the eye, and you really don’t want to be distracted by your own weapon. Most likely, the opponent in this stance is going to backpedal and trace, throwing a chop at you when you attack them. The predictable angle of this attack from this position makes them ripe for either a stutter-step to draw the attack (leading to a block and riposte) if your opponent is extra twitchy, or an attack with a return to guard through the block against this attack.
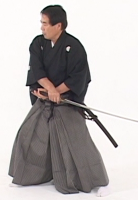
The third stance is Hidari Waki, which is essentially a mirror of the Migi Waki. The dominant-hand foot is forward, feet are about a shoulder-width and a half apart, and the sword is held at the read (off-hand) hip. Note that the hands are now crossed. This crossing limits shot options even more and decreases overall flexibility; at some point you have to uncross those arms. Essentially all the same problems that existed in Migi Waki are repeated here. The two best attack options against this stance are a quick chop at the exposed forward arm of the dominant hand followed by an aggressive block to the off-hand side of the fighter or stepping in with an aggressive block to stuff the sword of the opponent followed by a short hared chop to the body and returning to an outside guard to keep stuffing the opponent’s sword so he doesn’t hit you late. No one likes being hit. If fighting single sword, holding your sword in the hand matched against his off-hand side will allow you to stuff the opponent more completely without having to reach across your own body. Reaching across your own body means you’re stuffing him with an inside block, and ideally you want people stuffed with outside blocks so they’re deep into the outside lane.
Part 3: One-Hand Cuts

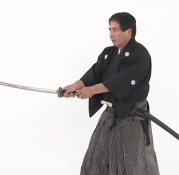
Next the video moves on to talk about cuts. At last, some combat. The first cut is the Kiri Age, which is a rising cut. This cut, like many others, starts with a sheathed weapon. Sadly, I’ve seen people holding their weapon at their side to simulate a sheathed weapon. Attacks done from this starting position never work on anyone with a clue; the attack is completely telegraphed and is easily stuffed or baited. So I’m just going to focus on the actual strike here.
The strike image shows the start, middle, and end positions. The strike starts with the blade point down. The arm straightens to give initial power to the strike, but the majority of the rotation comes from the wrist. The arm rises at the end of the strike, using the shoulder to pull the strike through. As a stand-alone shot, this is a terrible idea; predictable, monochromatic, and with an awkward starting position. However, there is something that can be gleaned from this. The mechanic of the snapping upward strike can be used as part of a sequence, such as a riposte from a deep inside block (where it might be an ideal riposte). It would be important to finish the move not with the arm held above, but with rotating the hand from palm-out back to palm-in and bringing the hand back down to the standard high guard.
The second cut they demonstrated was Tsukikage, which means “Moonshadow.” I will pause briefly while a bunch of Japanophiles change their game name to Tsukikage. Go ahead, I’ll wait. This strike is a simple one-handed rising diagonal chop from the off-hand hip. It is aimed at the eye-line of the opponent, assuming the opponent has the stereotypical over-the-head Kendo stance. The intent is to strike at the wrists and menace the eyes. The strike itself is predictable, slow, and not legal in any of the foam-fighting games I’m aware of. Also, people with their swords held over their heads can be stabbed so hard in the solar plexus that they fall down so you don’t need this shot anyway and I’m not even going to show a picture of it.
However, the concept of moving things across the eye-line is worth noting; people tend to track and flinch away from things that cross their eye-line at close range. Also, while they blink they are losing contact with their changing fighting environment for a fraction of a second. You can use this moment to alter your attack, surprising them in their moment of disconnect.
Part 4: Two-Handed Cuts
The first cut is the Migi Gyaku Kesa. It is the almost inevitable attack from the previously mentioned Hidari Waki stance. It is a rising two-handed chop from the off-hand hip up and across the body. No new information is added from our discussion of the Hidari Waki stance, and the demonstrated strike has all the drawbacks and weaknesses that I speculated about earlier.
The second cut is the Hidari Gyaku Kesa. It is the almost inevitable attack from the previously mentioned Migi Waki stance and mirrors the Migi Gyaku Kesa chop. It looks a lot like golf and would be about as effective in foam combat. The less said the better.
Part 5: Thrusts
Three thrusts are mentioned in this section. The first is a “draw and stab the guy behind you” move. It is somewhat awkward and is probably useful if you’re carrying a real sword and get ambushed, but has no relevance at all to foam fighting. The third is a full-lunge stab to the face, which is a terrible idea for foam fighting.
The second thrust is Morote Tsuki, a simple body thrust that is worth looking at. The sword is held two-handed directly ahead of the body in a neutral middle guard (which traditionally in foam fighting means “chop me in the forearm repeatedly) and is executing by stepping forward and using the body to provide the majority of the forward action of the strike. The arm movement is minimal and is only completed at the end of the strike.
The idea of body movement before weapon movement is worth extracting from this attack. Moving the body first allows the closing of range without giving away the specific attack and will prevent people from keying their defensive actions off of blade movement. It also allows you to keep your guard position and allows you to react to people’s counters as you close without having to counteract the attack movement of your own weapon. The downside is that you give up some element of the initiative; you may be forcing them to react, but you’re leaving open the choice of the form that reaction takes. In the final analysis, initiating your attack’s body movement before your weapon movement is a good option, but it is not a one-size-fits all solution for closing and attacking.
Part 6: Katas
Don’t get your hopes up; I’m not going to break down all the Katas. The whole idea of katas needs an entire article just to begin to address, so you’ll have to wait for that. Stringing specific strikes together into specific multi-stage actions has the advantage of drilling in complex motion which can be reproduced at high speed with great precision, but has the drawback of having to address the vast diversity of combat scenarios. I’ll talk about his another day.
Part 7: Drills
The first drill is called Tsukikage, which is the same name as an attack mentioned earlier. I note a distinct lack of creativity here. The drill is much more complex than the classic block-strike drill so well known in Amtgard. The drill begins with the attacker in the moving into the aforementioned “sword next to head” stance out of range. He steps in and cuts in a downward chop. The defender brings his sword up in a hard block, rising at the hips to absorb the force of the blow. Both opponents step in, ending up corps-a-corps with the swords at mid-height. They exit this scenario by pushing out and up, raising their swords to a high guard and stepping back. Both step back to the “sword-at-dominant-hand-hip-with-off-hand-leg forward” stance. The attacker then chooses a target; knee, hip, or shoulder. He steps forward and throws a flat chop at the chosen target. The defender uses range control to evade the attack and counter-attacks with a chop to the head, which is the “kill” in this drill.
Ultimately, the specific attacks of this drill (or the second drill, which follows a similar pattern) are not what is interesting. What is interesting is the complexity of the drill. There are two discrete attacks that make up this drill, all of which incorporate transitions, footwork, range control, and timing. The drill is complex enough to practice all these things without being so complex that it requires a lot of practice in order to be able to practice the drill.
This is the most useful thing I’ve gotten from this video, and proves to be the one “golden nugget” I always hope to find when I encounter a lecture where I already know most of the material. Finding a middle ground between mechanical drills like “block strike” and free-form practice like “sparring” would be useful in my training. I’ve often worked out specific shot sequences to work through a flaw in my partner’s technique, repeating the actions until the issue is corrected, but the concept of specifically chaining entire attack sequences into a single drill is worth addressing.
The Recap
As I expected, there isn’t really very much “why”. I’m not getting any theory which I can use to build my own fighting; I’m getting a cookbook of moves I can replicate if I want to fight exactly the way they do. However, using my own experience I can extract some basic concepts from behind what is shown in the video. I don’t recommend this video to anybody trying to improve their fighting; you’re only going to be able to extract lessons you already know, though you can, of course, share them with others.